


Table of Contents
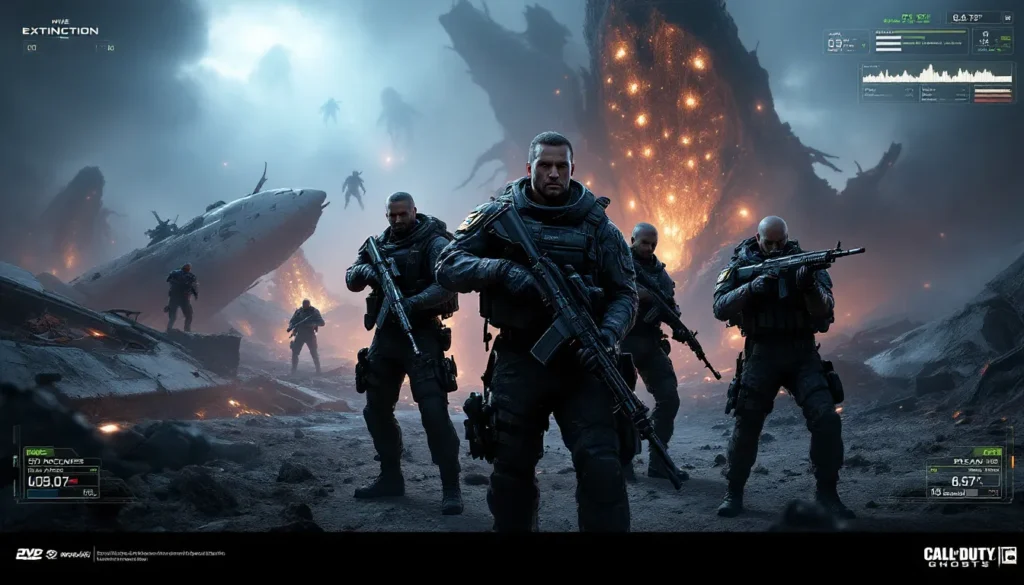
ToggleExtinction mode in Call of Duty: Ghosts stands as one of the franchise’s most underrated cooperative experiences. Forget what you know about traditional zombie modes, this alien-focused survival experience demands a different approach, sharper strategy, and tighter squad coordination. Whether you’re tackling it on Mayday’s ravaged landscapes or Nightfall’s cramped urban streets, understanding the core mechanics and enemy patterns can mean the difference between a triumphant run and a squad wipe at wave five. This guide walks you through everything you need to dominate extinction mode, from weapon selection and loadout optimization to advanced tactics that’ll have your team pushing deeper into alien hordes than ever before.
Key Takeaways
- Call of Duty: Ghosts Extinction mode is a four-player cooperative alien-survival experience that demands strategic positioning, resource management, and squad coordination rather than reflexes alone.
- Master weapon loadouts and equipment prioritization by purchasing armor and ammo capacity first, then scaling damage upgrades and specialized tools as waves progress.
- Successful extinction runs require strict role distribution, designated fallback positions, and constant verbal communication about ammo status, enemy positions, and hive focus targets.
- Understanding alien creature types—from basic Seekers to heavy Apex Predators and explosive Tankers—allows teams to adapt defensive tactics and allocate firepower efficiently across waves.
- Map knowledge of hive locations, resource spawn points, and defensive chokepoints directly impacts survival odds; Mayday favors defensive bunking while Nightfall rewards vertical positioning tactics.
- Avoid common mistakes like overspending on cosmetics early, splitting squad positioning beyond 15-20 meters, or neglecting fallback positions during low-pressure waves.
What Is Extinction Mode in Call of Duty Ghosts?
Extinction mode is a four-player cooperative experience where teams fight off waves of extraterrestrial creatures with the primary objective of destroying alien hives before being overwhelmed. Launched alongside Call of Duty: Ghosts on November 5, 2013 (with DLC maps following throughout 2014), extinction carves out its own identity separate from traditional zombies-style modes. The gameplay loop revolves around surviving escalating waves, collecting resources, and strategically progressing across maps to eliminate hive structures. Unlike straightforward wave-based survival, extinction introduces map traversal, dynamic environmental hazards, and creature variety that demands players constantly adapt their tactics. The mode is available on PC, PlayStation 3, PlayStation 4, Xbox 360, and Xbox One, giving players across platforms access to this unique cooperative challenge. It’s designed for replayability, each run feels different depending on how teams allocate resources, which routes they take, and how effectively they coordinate under pressure.
Core Gameplay Mechanics and Objectives
The foundation of extinction mode rests on three interconnected mechanics: map navigation, wave-based combat, and hive destruction. Understanding how these systems interact is critical for survival.
Map Layouts and Exploration
Each extinction map presents a sprawling environment that teams must explore methodically. Maps aren’t linear, they branch into multiple pathways, side objectives, and resource-rich zones that reward exploration. Navigation matters because positioning your team near the next hive location while maintaining sightlines toward approaching enemies determines survival odds. The larger maps like Mayday and Nightfall feature multiple routes to objectives, allowing squads to choose easier or harder paths based on their collective skill level and loadout composition. Some routes funnel aliens into chokepoints, while others expose your team to flanking attacks from multiple angles. Learning map layouts and resource spawn locations transforms from optional knowledge into core survival strategy, you’ll want to memorize where cash pickups cluster, which doors lead to ammunition caches, and which corners provide defensive high ground.
Wave-Based Combat System
Waves escalate in difficulty as your team progresses. Early waves feature smaller alien groups that are manageable even with basic weapons, but each subsequent wave introduces more creatures, tougher variants, and faster respawn timers. Between waves, your squad gets brief windows to reorganize, heal up, and prepare defensive positions. The wave system forces constant decision-making: do you push toward the next hive now or consolidate resources and health? Do you spend points on ammo or save for critical equipment upgrades? Effective wave management means reading your team’s ammunition and health status before each wave launches, running low on both is a recipe for disaster. The spawn patterns become predictable once you’ve run maps multiple times, allowing experienced players to preposition themselves and set traps ahead of incoming threats.
Hive Destruction and Progression
Each map contains multiple alien hives that must be destroyed to progress and eventually complete the map. Hives are stationary targets with substantial health pools and protective barriers. Teams must allocate resources and firepower toward hive destruction while simultaneously defending against constant alien attacks. The progression system tracks hive health across the entire squad, damage from any player counts toward the shared pool. This mechanic encourages split focus: maintain crowd control on incoming aliens while designating one or two squad members to focus DPS on hive targets. Some hives require specific conditions before they become vulnerable (destroying defense pods, deactivating shields, etc.), adding layer-by-layer progression goals that keep teams engaged and planning multiple steps ahead.
Essential Weapons, Equipment, and Loadouts
Your weapon loadout and equipment choices dramatically impact survival odds. Loadouts should reflect your role within the squad and the specific map layout you’re tackling.
Tier-One Weapons for Every Playstyle
Assault Rifles like the FAMAS and Honey Badger provide solid all-around DPS with manageable recoil and decent accuracy at medium range. They’re reliable choices for general alien crowd control and scale reasonably well into higher waves. Shotguns like the SASG-12 and Tac-12 excel in close quarters, delivering massive single-shot damage that melts tougher alien variants when positioned correctly. Shotgunners should anchor defensive positions where aliens funnel into predictable paths. LMGs like the LSAT and Chain SAW provide sustained damage and larger magazine pools, perfect for suppressing large groups and maintaining fire without frequent reloads. They’re slightly slower to aim down sights (ADS), but raw DPS output compensates in wave-based scenarios. Sniper rifles like the L115A1 one-shot most creatures but suffer from slow reload times and require discipline, they’re better for experienced players who can maintain accuracy under pressure. SMGs like the Vector K10 shine in the early waves and can be converted into viable wave tools if paired with headshot discipline and positioning discipline.
Weapon selection should match your squad’s overall composition. A balanced team might run one LMG, one assault rifle, one shotgun, and one sniper, covering different damage profiles and ranges. In higher difficulties, redundancy matters less than raw firepower, so teams might stack multiple LMGs and assault rifles focused purely on wave clear.
Specialized Equipment and Killstreaks
Equipment choices separate good squads from great ones. Armor is a first-priority purchase early in runs, increasing your health pool gives you breathing room during chaotic waves. Ammo Capacity Upgrade expands magazine sizes and reserve ammunition, critical for sustaining suppressive fire across multiple waves. Weapon Upgrade Kits boost weapon damage, fire rate, or handling, prioritize these when your team has foundational equipment covered.
Killstreaks in extinction function differently than multiplayer, they’re earned through eliminations but reward squad-wide benefits. Sentry Turret deploys an automated defense that locks onto approaching enemies, providing passive crowd control while your team focuses DPS on hives. Maniac transforms you into an unstoppable melee machine with enhanced movement and health regeneration, perfect for aggressive hive phases. Frenzy grants temporary invulnerability and increased damage output, ideal for panic moments when waves overwhelm your position. Most squads rotate through these based on wave intensity: early waves use Sentry for passive defense, mid-waves transition to Maniac when facing tougher alien variants, and late-game waves might use Frenzy as an emergency reset button.
Strategic Tips for Solo and Squad Play
Extinction mode rewards careful resource planning and synchronized team actions. The gap between disorganized squads and coordinated teams becomes stark around wave five and beyond.
Resource Management and Ammo Conservation
Cash drops from eliminated aliens, your primary resource for purchasing upgrades. Early-game spending should prioritize foundational survival: armor, ammo capacity, and basic weapon upgrades. Avoid the trap of purchasing cosmetic upgrades or experimental killstreaks before your squad has core defensive tools. Mid-game (waves 3-5), teams should shift spending toward significant upgrades like Gas Mask (protection against toxic alien attacks) and Explosive Damage boosts if facing heavy-armored creatures.
Ammo conservation wins rounds. Empty magazines into low-priority targets when reserves are healthy, but switch to disciplined fire when ammunition gets tight. Most successful runs see teams rationing fire to only critical targets during ammo-scarce moments, letting weaker creatures pass while focusing killshots on alphas and armor-plated variants. Ammo Drops from certain alien types should be immediately claimed by the player with the lowest reserve ammunition. Coordinate verbal callouts: “Low ammo north side” prevents friendly fire and ensures support reaches the right player.
Spending timing matters enormously. Some upgrades scale better at specific waves, Weapon Damage becomes more cost-effective in mid-to-late waves, while Armor Plating provides immediate survival benefits at any stage. Teams that discuss spending priority before waves start execute purchases faster and allocate cash more efficiently than squads making individual decisions.
Team Coordination and Role Distribution
Role distribution creates natural division of labor. Designate one player as Hive Specialist, their primary focus is dealing damage to hive targets while teammates handle alien crowd control. This prevents scattered DPS and ensures hives fall on schedule. Assign a Support Player responsible for purchasing upgrades when funds allow, maintaining map positioning for resource pickups, and verbal callout responsibilities, who’s covering which entrance, who’s low on health, etc.
Defensive positioning evolves as waves increase. Early waves allow relaxed spacing, but waves 5+ demand tight clustering around critical choke points. Your squad should have a designated fallback position, a defensible corner with multiple sightlines where you make your final stand if aliens start overwhelming areas. Teams that practice retreating to fallback positions tactically survive longer than those that scatter or get separated.
Communication absolutely matters. Mastering Call of Duty: emphasizes how callouts and squad awareness separate casual play from competitive performance. In extinction, this translates to constant updates: “Three crawlers pushing west,” “Hive health critical, focus fire,” “Resupply north room, come grab ammo.” Squads that execute clean communication win more consistently than those relying on proximity chat and visual cues.
Enemy Types and Defensive Strategies
Extinction’s alien roster includes distinct creature types, each demanding specific tactical responses. Understanding strengths and weaknesses transforms overwhelming waves into manageable encounters.
Understanding Alien Creature Types
Seekers are the baseline alien unit, fast, relatively weak, but dangerous in large groups. They charge directly at your squad and deal minor damage per hit. Early waves feature exclusively Seekers: they’re practice targets teaching positioning and trigger discipline. Cryptids are armored variants with increased health pools and damage output. They move slower but absorb significantly more firepower. Headshots become worthwhile on Cryptids, consistent accuracy pays dividends. Hives spawn Acid Drops that splash across the ground, creating persistent hazard zones. Avoid standing in acid and reposition frequently.
Apex Predators are heavy-hitters with substantial armor and aggressive attack patterns. They ignore lighter weapons and demand focused fire from multiple squad members. Single-player focus fire fails against Apex units, coordinate to drop them before they close distance and overwhelm your position. Tankers are explosive variants that detonate on death, dealing area damage. Kite them away from clusters of allies before executing kills, or time detonations during low-population moments.
Boss creatures appear periodically and feature extreme health pools and unique attack patterns. Bosses shouldn’t surprise your squad, wave indicators predict their arrival, allowing preparation time. Designate roles before boss waves arrive: two players maintain suppressive fire on approaching Seekers while two focus exclusive DPS on the boss. Splitting focus against boss waves gets your squad killed.
Tactical Approaches to Bosses and Waves
Boss waves demand coordinated burst damage. LMG users should trigger Frenzy killstreaks to unleash sustained suppressive fire while Assault Rifle specialists land headshots on boss weak points (usually head or back armor segments). Never engage bosses in open space, force them into narrow corridors where they can’t circle your position. Use environmental cover to maintain distance and avoid melee attacks.
Wave 6+ introduces extreme pressure where single mistakes cascade into wipes. Position your fallback location before waves launch, not during. Maintain high ground advantage whenever possible, elevated positions force aliens into predictable climbing animations, creating guaranteed headshot opportunities. Sprint discipline becomes critical too: never extend beyond your squad’s effective suppressive fire range. Isolated players die instantly in late waves.
Unlockables, Customization, and Progression
Extinction’s progression system rewards consistent play with permanent upgrades and cosmetic customization that persist across runs.
Earning and Spending Credits
Credits accumulate from wave completions, enemy eliminations, and hive destruction. Early-run credits should funnel toward core survival upgrades: Armor Package, Ammo Capacity, and Weapon Damage Multipliers. Don’t waste credits on cosmetics before your squad has foundational survival tools, a stylish mask means nothing when you’re dead.
Mid-game spending (waves 4-6) should focus on specialized upgrades like Explosive Damage (for tougher alien variants), Fire Rate improvements, and Magazine Size expansion. These upgrades scale multiplicatively, pairing Explosive Damage with an LMG creates devastating suppressive fire that melts packed alien groups.
Late-game spending (wave 7+) shifts toward survival-critical purchases. Health Regeneration, Armor Regeneration, and Revive Assistance become invaluable when maintaining full health becomes impossible. Some squads reserve credits for emergency purchases during boss waves rather than spending everything early.
Perks unlock through progression and offer passive benefits applying to all future runs. Resilience reduces damage taken, Sleuth highlights enemies through walls (invaluable for preparation), and Close Quarters grants melee damage bonuses. Unlock Perks strategically, Sleuth should be an early priority for information advantages, while Resilience helps struggling squads survive longer.
Cosmetics, Perks, and Class Builds
Cosmetics let players customize appearance without mechanical advantage. Masks, armor skins, and weapon skins provide visual distinction but offer zero gameplay benefit. Save cosmetic spending for late-run moments when survival upgrades are saturated or during shorter warmup runs.
Class builds let squads specialize further. An aggressive build pairs Shotgun loadout with Maniac killstreaks and Close Quarters perks. A support build features LMG loadouts, Sentry Turret killstreaks, and Resilience perks. Defensive builds center on Sniper loadouts with Armor focus and Sleuth perks. Teams matching class builds to Perk selections create powerful synergies, the aggressive player with Close Quarters perk and Shotgun gets noticeably stronger, while support players with Resilience perk and Armor upgrades become unkillable.
Progression tracking shows long-term accomplishment metrics. Completing maps on higher difficulties unlocks exclusive cosmetics and perk slots, rewarding veteran players with meaningful rewards beyond simple bragging rights. The most engaged extinction players maintain detailed spreadsheets tracking map completion stats, preferred loadouts, and efficiency metrics, treating the mode with the same seriousness competitive players bring to multiplayer.
All Extinction Maps: Strengths, Challenges, and Strategies
Extinction maps feature distinct environmental layouts, creature spawns, and hive placements demanding adapted strategies.
Mayday and Rural Environments
Mayday serves as the series’ flagship extinction map, featuring a ravaged crash site with overturned aircraft wreckage, destroyed vehicles, and scattered alien structures. The rural setting provides varied cover, wreckage creates natural defensive positions, and spread-out hive locations force navigation across the entire map. Mayday favors defensive playstyles: teams that bunker down around hive locations and let creatures funnel toward strong positions win consistently. The map’s middle section features tight corridors ideal for shotgun specialists, while open areas challenge ranged weapon users.
Key strategies for Mayday: establish fallback near the final hive location early, practice efficient routing between hive points, and leverage the aircraft fuselage as a multi-stage defensive position. The weather system occasionally introduces visibility changes, exploit reduced visibility to safely reposition or avoid incoming alpha creatures.
Nightfall introduces urban density to extinction, featuring tight city streets, building interiors, and multi-level verticality. Buildings provide vertical defensive positions, upper floors prevent ground-level creatures from easily accessing your squad but limit escape routes. Call of Duty fans appreciate Nightfall for its tactical complexity: rooftop positioning forces aerial creature management while ground spawns remain dangerous below. The map’s narrow corridors create bottlenecks favoring LMG suppressive fire, multiple creatures can’t spread out horizontally, making suppression incredibly effective.
Key strategies for Nightfall: use vertical positioning to control creature approach vectors, avoid extended ground-level exposure, and identify multiple rooftop fallback positions. Interior buildings provide temporary shelter during intense spawn waves, learn which building interiors offer optimal chokepoint leverage.
Nightfall demands superior map knowledge compared to Mayday, new players struggle with verticality and creature spawns from multiple levels. Veterans exploit vertical positioning so effectively that Nightfall becomes easier than Mayday once mastered.
Common Mistakes and How to Avoid Them
Even experienced players fall into predictable traps. Recognizing and avoiding these mistakes accelerates improvement dramatically.
Overspending early kills countless runs. Purchasing cosmetics or experimental killstreaks before armor and damage upgrades are locked in is self-sabotage. Establish spending priorities: armor first, damage second, specialized upgrades third, cosmetics last.
Splitting squad position gets isolated players killed in waves 4+. Teams should remain within roughly 15-20 meters of each other, close enough to provide covering fire and revive incapacitated teammates. Extended distance leads to picked-off squad members and avalanche wipes.
Ignoring ammo economy forces desperate scavenging during critical moments. Track reserve ammunition constantly. Call out ammo status to teammates, “Low ammo, need support,” triggers teammates to direct fire toward your location and revive if necessary.
Underestimating hive health causes timing failures. Hives require sustained DPS across multiple waves. If your squad’s damage output can’t push hive health below certain thresholds by predetermined waves, future waves become impossibly difficult. Calculate required DPS and adjust loadouts accordingly.
Neglecting fallback positions during early waves means scrambling during late-game intensity. Identify defensive positions during peaceful moments, don’t discover them when aliens are overwhelming. Practice retreating tactically to fallback locations during low-stakes waves.
Ignoring creature types while maintaining generic tactics wastes ammunition on wrong targets. Seekers die to any firepower, but Cryptids and Apex units demand focus fire. Differentiate enemy threats and adjust responses accordingly.
Panic spending during boss waves burns credits on ineffective upgrades. Pre-plan boss-wave spending during preparation phases. Identify which upgrades provide maximum survival benefit, usually armor or health-related, and reserve credits for emergency purchases.
Research shows that squad communication failures account for roughly 40% of extinction run failures according to Game Rant community breakdowns. Teams implementing strict callout protocols and role designation improve survival rates 30%+ above squads relying on organic coordination.
Conclusion
Extinction mode demands more than reflexes and raw firepower, it requires strategic thinking, team coordination, and map-specific knowledge that separates casual players from accomplished survivors. Success means understanding creature behaviors, managing resources like experienced accountants, and maintaining discipline during chaotic alien assaults. Whether tackling Mayday’s sprawling crash site or Nightfall’s urban verticality, the core principles remain constant: communicate clearly, conserve ammunition, establish fallback positions, and designate roles before waves launch.
Your extinction journey won’t follow a linear progression. Early attempts will fumble around, and teams will discover new tactics and optimizations through failure. That experimentation phase builds the intuitive understanding separating competent players from extinction veterans. The guides and strategies outlined above accelerate that learning curve, implemented consistently, they transform extinction from frustrating alien-slaughter simulator into rewarding cooperative challenge. Start with foundational tactics, gradually layer in advanced positioning and resource management, and soon your squad will push to wave 10+ on even the most challenging maps. The alien onslaught awaits, but armed with proper strategy and squad coordination, your team has every advantage needed to survive.